By: Andrew Hobgood
So, my conversion is complete, and except for a few tiny issues, it works incredibly well.
For the overview, the patient is a MY02 WRX (GD2) with the 4EAT transmission (TIN TVA14YN1AA). It suffered one center differential failure (input sun to epicyclic diff gearset failed and sheared, as did contact faces on the input side of the planets). This was replaced to the tune of over $2500 in parts and labor. About 9 months later, the transmission started shifting poorly and flaring on cold fluid (winter here in New Hampshire). One morning, the car refused to go into any gear and wouldn’t move. Shavings were found, and the current best guest is that the oil pump in the transmission disintegrated.
Now, tired of dealing with not being able to repair an automatic, I decided to replace it with a 5MT gearbox. This would give me less driveline loss and better overall acceleration performance, and I was tired of being harangued for not knowing how to drive one. The auto tranny has its definite advantages — but it was time for me to move to something else.
I bought a 1990 Audi 80 quattro ($800) to get around while the WRX was off the road, and to learn the minutiae of driving a 5MT.
I came across the 5MT (TIN TY752VJ1AA) from a MY93 Legacy Turbo (BC6). It had about 150k miles on it… but it was already out of the donor car and sitting in the garage of a friend, attached to the motor. The price was right ($100), and figuring out how to separate it. I pulled it, deadlifted it into the back of the Audi, and brought it home.
The front final drive was now dropping to a 3.90 from the original 4.11 of the auto WRX. Unlike the 5MT WRX, the BC6 transmission used a 1:1 center transfer ratio, so I needed a 3.90 rear differential. I didn’t want to give up LSD, so I had two options — get a 3.90 LSD from a Legacy Turbo (only available in LSD for one MY, and would require different axles), or do a ring/pinion conversion on my stock 4.11 unit.
I decided to do the latter. I obtained a 3.90 open rear differential unit from a friend who had it sitting in his closet after a Legacy Turbo LSD conversion into his Outback Sport. Again, the price was right — it was free for the taking, since he needed to clean out his condo. Conditional on this was that I take the axles off his hands too — spares for the rally car! 😀
I had Bill’s Driveline in Manchester, NH do the ring/pinion conversion, since I lacked the experience, equipment, and parts to do it myself. $200 later, I had a 3.90 LSD that would use my stock axles, and was assembled to the right tolerances, and re-shimmed by a professional.
The new transmission crossmember and starter were obtained from a 5MT 1992 Legacy wagon (BF4) at pick-apart yard in Worcester, MA. I also took the pedal kit and some shifter interior pieces in case I’d need them. We also rolled a 1993 1.8L AWD Impreza onto its side and pulled the propshaft, with the hopes that it might fit… $21, and I had all of the above.
The pedal set and propshaft from above didn’t end up working, so I ordered a WRX pedal set, clutch master cylinder, clutch hard line, soft line, bracket, and slave cylinder for $180 from Suzuki Subaru Kia Parts in Rancho Cordova, CA. The propshaft from a 5MT WRX was purchased for $185 from F&S Auto Parts in Roxbury, CT.
Clutch, flywheel, and pressure plate were out of a WRX with approximately 9k miles, and were nearly pristine. I got them for free from a little birdie at a local dealership, as they were removed from a vehicle under the clutch shudder TSB. I also received an STi short shift linkage (without lever) for free from another birdie at another local dealership.
Throwout bearing, vehicle speed sensor, some wiring harnesses, and other miscellaneous bits were ordered new from Exeter Subaru and Manchester Subaru. I also ordered various hardware pieces, most notably a $40 part to mate the STi linkage up to the 5MT’s shift linkage shaft. I also bought a lot of nuts and bolts. While the car was apart, I also put in WhiteLine rear subframe bushings, rear subframe locking kit, STi transmission mount, STi pitch mount, a Kartboy short shift lever and Knuckleball, and a gutted WRX up-pipe.
We removed the stock 4EAT and rear diff by following the instructions in the manuals, more or less. We had hard copies of the factory transmission and wiring manuals, as well as the Haynes Legacy manual. The remainder of the important manuals (chassis, primarily) were electronically available on a laptop in the garage.
The rear diff was re-geared, put back in with the new subframe bushings and locking kit, and the rear suspension was reassembled.
While the 5MT was separated, we swapped out the stock Legacy linkage for the STi short-shift linkage. Particularly, this involved removing a double spring pin that held the linkage joint to the main shift rod. Using a punch and hammer, drill, mallet, etc., we made no progress. No lubricant would penetrate, and the metals appeared seized together. The smaller inner pin drilled out with no problem, but we broke drill bits trying to drill out the bigger one. We ended up using a small bolt, C-clamp, and O2 socket, as well as a ball joint puller and breaker bar, to force out the spring pin. Conservative calculations say that it took about 30 tons of force to get the pin out — wow. Once the pin was separated, the joint wouldn’t come off the rod… we ended up Dremeling it off one chunk at a time until the whole thing came off.
This accomplished (over two days, probably dumped 10 or more man-hours into the freakin’ thing), we cleaned up and oiled the linkage rod and attached the new joint with a bolt, nut, and lock washer.
The 5MT went in by following the manuals as well, with the new mounts going in. The front pair of holes for the 5MT transmission crossmember had little plastic plugs in them, but were pre-drilled and tapped. Score another point for parts-bin engineering. Alignment was a *****, but we got it all to come together.
We did the up-pipe in here too, which involved draining all the coolant, as it was all coming out of the turbo lines anyway.
The hydraulics went in, as did the pedals. Once again, parts-bin engineering prevailed, as the holes were already cut in the firewall and the firewall insulation for the clutch master cylinder. The starter wire needed a little massaging to stretch all the way to the terminal on the MT starter, but it wasn’t a big deal.
The WRX propshaft rear section was perfect length from the bearing to the diff, but the front section is about 1cm too short. Realistically, there’s plenty of spline engaged in that sleeve yoke that there’s plenty of strength, and no leaks. The only way to do this right is to use an Impreza rear section and a Legacy front section, or to lengthen my existing one. I might do this if it proves to be a problem as time goes on.
Now, with everything hooked up, I filled the gearbox with Redline Shockproof Light (pureed Smurf!) and the rear diff with Redline 75W90NS. All synthetic oils… expensive, but I need all the protection I can get.
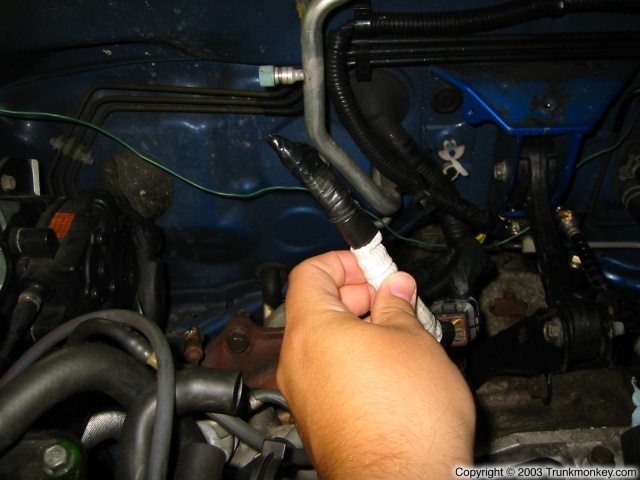
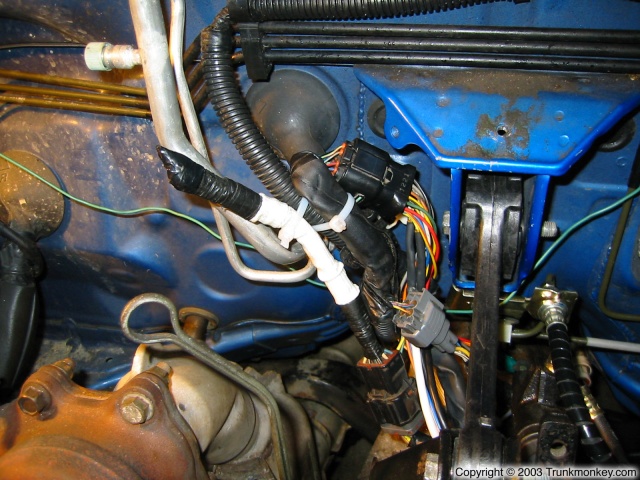
I made a custom wiring harness using the vehicle speed sensor extension wire from a WRX, the reverse/neutral harness from the BC6 transmission, and the harnesses from the 4EAT… one harness tricked the starter circuit (the P-N sense switch on the inhibitor switch harness), and the other harness brings vehicle speed, reverse, and neutral sensors all into the driver’s footwell, where the TCU would normally reside, without running new wires through the firewall.
I then set to work splicing, getting the vehicle speed sensor wired up to send its signal on what used to be the vehicle speed output signal on the TCU. I pulled ground from a nearby harness, and ignition supply from what used to supply the TCU. The N and R wires are still unattached, so my reverse lights don’t work yet.
After that, she ran perfectly. Started fine, idles great, no problems. It occasionally throws a P1596 (AT diagnosis signal high) CEL, but it doesn’t limp… I just need to figure out how to get it to stop looking for the TCU. 😀 At the worst, this would be an ECU swap, but as it stands now, the CEL is barely a problem.
Important parts and approximate prices:
- transmission (TIN TY752VJ1AA): $100
- 3.9 open rear diff (from MT OBS): Free
- rear diff conversion labor: $200
- shudder takeoff clutch, flywheel, pressure plate: Free
- clutch master cylinder, lines, slave, and pedals (WRX): $180
- WRX 5MT propshaft: $185
- junkyard MT starter motor: $15
- junkyard tranny crossmember: $6
- new WRX vehicle speed sensor: $60
- new WRX VSS harness: $25
- STi transmission mount: $90
- fluids (gear oil, coolant): $50
- STi short shift linkage: Free
- Kartboy shift lever: $100
- Kartboy Knuckleball: $30
So, all told, a bit over $1000 for the important stuff, and $1300 including new bushings, short shift stuff, and other optional items.
Important tools…
- Breaker bars (suspension components!)
- Torque wrench (don’t overdo it, kids…)
- PB Blaster (beats WD40)
- Engine assembly lube (with moly, lithium, and graphite… for throwout bearing)
- Spray lithium grease (for other random greasing)
- C-clamps and patience (for removing that odd Spring Pin of Doom)
- small Frenchman (proved invaluable at fitting in small spaces)
- transmission jack (getting the tranny into the car
- would be virtually impossible without this)
- ratcheting box wrenches
Big thanks to:
mad-dog999 — Can’t thank him enough. This guy used his unnaturally long arms and skinny hands and body to fit into spaces that my 6’3″ 275lb frame simply couldn’t. He was there every weekend, through every last hour of this job. He kept encouraging me when I though it would never happen, and proved to be the best assistant that money can’t buy. 😀 There’s a reason we’ve got him as the crew chief for our rally team… 🙂
IggDawg — for the garage, muscle, mechanical advantage, and comic relief.
Sephro — thanks for letting us use your tools, and break them… 😀 also, mad props for finding a transmission jack.
wac — for the free diff and wiring suggestions
Darshu — for the nearly free transmission, and paying for my shaft. 😆
dano — for grabbing my shaft. :p
Sean, webkris, LinuxGuy, and anyone else who stopped by — thanks for labor and encouragement. 😀
North Ursalia and subaruwrxparts.com — thanks for putting up with my parts questions, searches, orders, returns, re-orders, etc… and mad phat dealz y0!
joe z and Sully at Manchester Subaru — more parts and such…
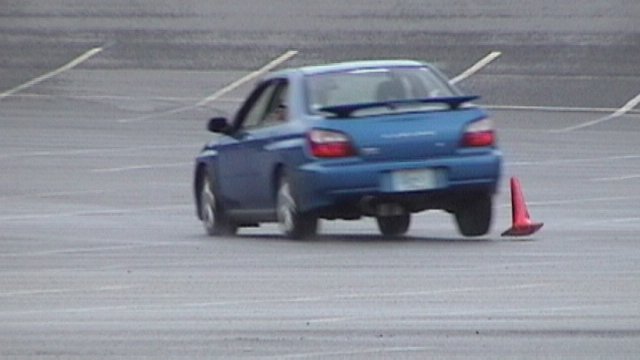
First off, it’s working great so far! 😀
The car is so fast now… between the drivetrain and the up-pipe, it just pulls and pulls…
Unfortunately, there aren’t a whole lot of pictures… neither mad-dog999 or I own a digital camera, and we were too busy actually doing the work to get pictures. 🙂 Sean and webkris occasionally stopped by to snap some pictures, so I’ll see what I can dig up.
Most of the process is well documented in the shop manuals, except for the actual bits that needed “conversion”…
Interesting key notes:
- Converting the Legacy Turbo cable speedometer to use an electronic sender was relatively easy. They both use the same diameter and thread pitch. I had to file down the upper part of the plastic housing for the electronic VSS to get it to clear the transmission case. After that, it just hooked right up.
- The clutch system of the BC6 tranny is identical to the WRX (pull-type hydraulic). All of the parts (including release bearing, clutch disk, pressure plate, and flywheel) are WRX parts. Same thing with the slave cylinder and other hydraulics… bolt patterns were identical for the slave cylinder, and the slave piston indent in the release fork was perfectly placed.
- Pressure plate bolts need to be bottomed out… the torque spec on them is 11 ft-lbs, but it takes way more than that to get the plate to seat onto the flywheel. Do them slowly and evenly until the plate is seated all the way, then just check and make sure that they’re down to your 11 ft-lb spec.
- Do NOT try and use old flex-plate bolts to attach the flywheel to the crank. We damaged the threads in one of the bolt-holes on the end of the crankshaft, and it was mangling threads on the bolts. We ended up re-tapping the hole before attaching the flywheel… it took a 10mmx1.0 (ultra-fine pitch, not the 1.25 fine pitch) tap and steady hands (on mad-dog999’s part) to make things right again.
- The wiring manual is invaluable for modifying the harnesses. Make sure you mark which page you’re working from so if you get distracted or lose your page, you come back to the right one… I screwed up at least once and made half of my wire colors for the turbo diagram, and half for the non-turbo. I realized this early, but it added some extra splice time to my efforts.
- On the inhibitor switch, only one wire is necessary to fool the starter… there’s a specific Park/Neutral starter interlock wire that is separate from the gear indicator wires… short those two contacts together. If you’re anal, you can connect these over to your neutral switch or make a starter interlock relay. I’m not that anal. 😀
- The other harness can be used to interface to the bulkhead harness to bring all of your signals into the car without running more wires. Use it. The TCU doesn’t need it anymore. 🙂
Right now, cruise control is broken, my reverse lights don’t light up, and I can start the car without the clutch in (though, some would argue that this is a feature). The car occasionally throws a P1596 MIL, but it doesn’t limp. I can check/clear the code from my in-dash SECS unit, so it’s no big deal.
Stub harness — this attaches to the inhibitor switch bulkhead connector to convince the starter to crank.
Custom bulkhead harness — this takes the VSS wires, neutral switch wires, and reverse switch wires and brings them into the car on the old signal I/O wires that used to go to the TCU. These come out on the B54/B55/B56 connectors that now no longer go into the bottom of the TCU under the steering column.
So, the one-week update…
Starting on Friday night, as the car was parked in its space overnight, it leaked a little bit of gear oil onto the pavement… I spent Saturday driving around, returned to my apartment, and when I opened up the hood, was greeted by smoke, which was more gear oil landing on the exhaust and burning off. Kept watching my level like a hawk (it had been slightly over-full) and did an autocross yesterday… the leak got progressively worse as time went on.
webkris, Mr. The Plague, Sean, and I put it up on jackstands last night, pulled the exhaust system and tranny crossmember and found the leak. The rearmost seal on the transmission was oozing fluid every time the shifter lever was moved. The rearmost seal is directly in front of the lower shifter pivot plate, and both are held to the transmission with a single (!) bolt. This appears to be factory standard on the older transmissions, and the newer ones use only two bolts. End result, the end plate on the transmission was flexing, causing the gasket to flex, and gear oil to ooze out.
Still, that plate has an additional four holes and two studs coming out of it which are all pre-threaded. I found some matching bolts and nuts in my box of Subaru parts, and managed to secure the plate better. Take it gradually when tightening, and don’t overtorque — it’s an aluminum case, and you will strip out threads if you try to put too much force onto them.
Bolted the transmission crossmember and exhaust back up, and it looks like there’s no more leaking at all. All in all, I lost a little over a quart of gear oil. I’m ordering some more to top it off and to have a stash around for if something like this happens again.

 The car is finally painted! The blue looks pretty decent and here’s a quickie rundown on car preparation…I’ll have a complete 50/50 (looks good at 50 MPH from 50 feet away) paintjob howto put together once I’m finished. In a nutshell: