 The car is finally painted! The blue looks pretty decent and here’s a quickie rundown on car preparation…I’ll have a complete 50/50 (looks good at 50 MPH from 50 feet away) paintjob howto put together once I’m finished. In a nutshell:
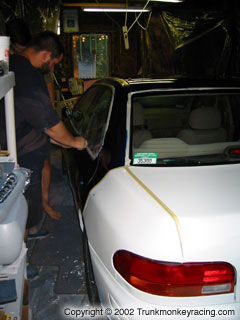
- Use 60 grain dry sandpaper on a handheld electric sander ($20) or, if you can afford it, random orbit sander with dust trap ($150). Sand through the clearcoat until you hit paint. Here I am prepping Kris’ rally Neon…notice the “white” dust. This is clearcoat dust…when the dust turns red, you’ve hit paint.
- Use 220 grain dry sandpaper on the same sander to smooth out the scrapes from the 60 grain and remove the swirl marks. Hitting the white electrically applied factory primer is good…hitting metal is bad but not Earth shattering.
- Drill holes and use a dent puller to yank out huge dents. Sand to bare metal then use a ball hammer to whack the holes back in. Sealer should then be used on the inside to reduce the chances of rust (I forgot to do this because I suck).
- Start Bondo body work where required. Scrape up with 60 grain and apply Bondo. Form Bondo with 100 grain. Smooth with 220 grain. 220 grain still leaves a rough surface but this is good…we want a hardcore tough paintjob, not a show paintjob.
- Use Bondo Finishing Putty to fill in all the air bubbles in the Bondo. It’s impossible to apply Bondo 100% smooth when you first start working with it.
- Prime all areas to be painted with Duplicolor Filler Primer or Plasti-kote Filler Primer. The filler primer is thicker, runs less and fills in the rough spots from sanding. I coat the entire car and then immediately start over from the beginning with a second coat while the first coat is still tacky.
- Let the car flash for 15 minutes until a dry skin forms over the primer and then repeat the two medium coats again. Let dry overnight, preferably a week or two to bake in the sun.
- Wet sand primer with 600 grain.
- Thoroughly wash car with automotive car wash fluid and tar/wax stripper.
- Spray down walls of painting area with water to reduce dust. Let car dry, use cotton lint-free towels.
- Use Prep-All or any other alcohol based paint prep solution to remove all residue and dust.
- Fire up compressor to full capacity at 60 PSI blow. Mix paints. MSA acrylic enamel requires a 8 parts paint to 4 parts reducer to 1 part hardener.
- Use cardboard or wood to test your spray pattern. It takes a while to get the proper air pressure to air flow to spray pattern mix.
- Blow down color just like the primer…coat the entire car with a light to medium coat so you can still see primer. Go back and do the entire car again immediately with a medium coat so you can’t see primer anymore.
- Let car flash for 10 to 15 minutes until a skin forms and is just barely tacky…if you press your finger will get wet. Spray down car again with two medium coats.
- This should be enough, let dry with an exhaust fan overnight. Move car outside the next day and let bake in the sun.